
Building Our Home From the Ground Up- Trusses, Framing, and Roof Decking
- May 10, 2025
- 4 min read
Hey everyone! It’s been a busy couple of weeks at our build site, and we’ve got a lot to catch you up on. We’re officially making major progress! Last week, our trusses went up, and this past week the team completed both the framing and the roof decking. With each step, we get more excited- one step closer to our dream home!

Trusses: The Roof Structure
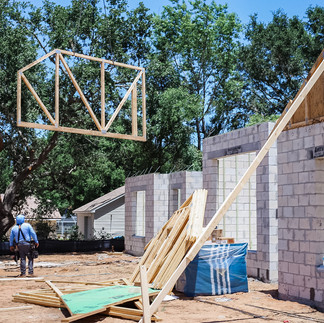
Now that the lintel pour is complete and our roof straps are in place, the next major structural component was installing the roof trusses. (We are currently sitting at one month since our concrete pour took place). These pre-engineered wood systems form the roof structure of our home. Did you know roof trusses are designed and built off site and shipped to the job? Check out the video below of our trusses being delivered. Each custom home we build is unique and the truss system is custom-designed to fit the exact dimensions of the home. The truss company and building engineer work together when completing the design of the home. In some cases the truss company will need to designate certain walls to be load bearing based on the roof design. This is where certain trusses will need an interior load bearing wall framed due to how the trusses are designed. This may also affect the foundation where we may need a load bearing wall footer. In our home, the only interior load bearing wall is in the dining room where our vaulted ceiling sits on the laundry room wall and where some of our kitchen trusses sit on the dining room entrance walls.
When we start "flying" trusses the crane and framing crew work together to set trusses in proper order to begin forming the roof structure. It’s always incredible to see how quickly a structure takes shape once these go up. Not only do trusses define the roofline, but they also help stabilize the entire framework of the home.


What takes place behind the scenes?
After the home design is finalized, we’ll send the design documents to our local truss company to begin drafting the truss layout. Once that’s completed, we’ll forward the layout to our building engineer or architect to finalize the truss plan. They’ll then incorporate any necessary structural details, such as load-bearing walls, footers, or other components needed to complete the structural plan.
At ACH, we also take the time to carefully review the truss plan in detail—checking truss profiles for vaulted ceilings, tray ceilings, and ensuring all exterior dimensions are accurate. This extra step helps us catch potential issues early on, preventing costly mistakes down the road.
We also coordinate with our local lumber company to get a lumber takeoff and schedule the delivery so that materials arrive before the trusses are set and the framing crew is ready to get started.
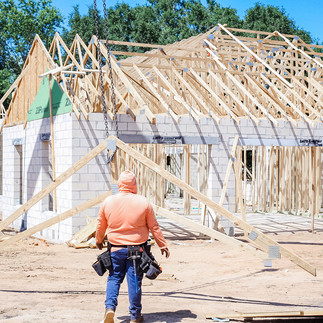
Framing: Bringing the Floor Plan to Life
After the trusses were in place, we moved on to framing the walls. (Note: The dining room load bearing walls were framed before truss flying took place). This is one of the most transformative stages of any home build. Suddenly, the layout you’ve only seen on paper starts to feel real—you can walk through rooms and truly get a sense of scale.
The framing process includes building all the vertical and horizontal wooden structures that make up the walls, floors, and ceilings. Precision is key here, and our crew did an excellent job sticking to the plans and maintaining level, plumb walls throughout. During this phase, we also worked closely with our supplier to obtain any additional lumber that the original take off didn't include.


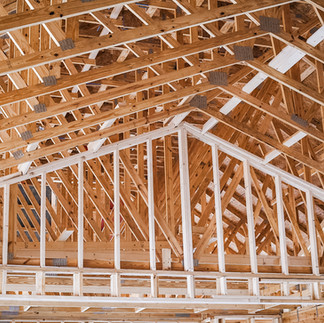


Roof Decking: Securing the Top Layer
During the framing stage, we moved onto roof decking, also known as roof sheathing. This involves attaching sheets of plywood or OSB (oriented strand board) to the top of the trusses to form a solid base for the roofing material. This step is essential for weatherproofing and provides structural support to the roof system. Our framing crew uses a decking crew that is specialized in completing the roof sheathing and framing components of the roof system. They are called the roof decking crew but they do a lot of framing as well. They install the "piggy back" trusses that form the final height of the home as well as the valleys and corners. They also frame all of the front soffit and fascia.


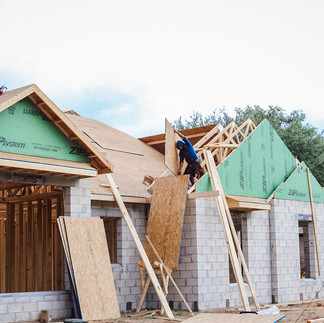


We made sure to use high-quality sheathing materials to set a strong foundation for the next phase: roof dry-in. At this point, the home is starting to look more “real”—walls are up, the roof deck is on, and it's easier to visualize the finished product.

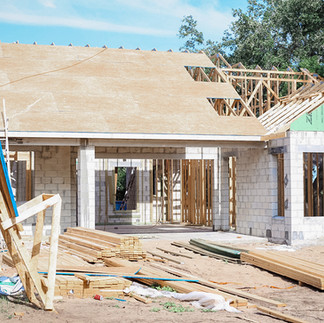
Framing Walkthrough: Final Adjustments Before Moving On
On Friday, my husband and I walked the home with our framing team for a framing walkthrough. This is an important quality control step where we reviewed each space to make sure everything matched our design intent. It’s also a great time to make any last-minute adjustments before moving on to the next stage.
During our walkthrough, we took the opportunity to make a few thoughtful adjustments that will better serve our day-to-day needs once we're living in the home. For example, we noticed that the closet in Bedroom 4 was larger than necessary, so we opted to shrink it slightly in order to create a dedicated linen closet in the neighboring master bathroom—a much more functional solution than our original plan of storing towels in the vanities or master closets. We also decided to modify the pantry door by narrowing its width, which gave us a bit more depth for shelving—making the space more efficient for long-term storage. It’s these small but meaningful tweaks that really tailor a home to how you plan to live in it.


What’s Next
Next up: we’ll be scheduling inspections for both wall sheathing and roof sheathing. Once those pass, we’ll begin the roof dry-in, which will temporarily seal the house from rain and moisture. From there, we’ll roll right into the MEPs—mechanical, electrical, and plumbing rough-ins—which will bring the interior to life.
Thanks for following along with our journey! We can’t wait to share the next steps with you soon. Hit the sign-up button in the top right corner if you’d like to stay up to date on our build.


Comments